Saturday, June 26, 2010

Crochet

When I was growing up, my mom used to knit and crochet a bit. She tried to teach me, but I was never very good at either. I could do the basic knit stitch and that's it. You can't make much of anything interesting with just the knit stitch. And crocheting... well, I could never make it past the first row no matter how many times she showed me.

I tried not to long ago to pick up knitting again. I love sewing, but I can't do that with the girls awake because they have to be up in the middle of things and Izzy isn't allowed near scissors due to the fact that she aspires to be a world-class hair dresser one day. So I thought knitting would be a good thing to do while they were playing or watching TV. Problem is, I have no real concentration for things like that. I can't keep up with counting how many purls I have done and whatnot. So I'm not a knitter.

A month or so ago, a friend of mine asked me if I could teach her to crochet. She wanted something to keep her occupied at night when her girlfriend works. I told her I couldn't, but that I noticed that once a month the library has a free crochet class and that I would go with her. Her girlfriend offered to keep the girls, and today we took our brand new crochet hooks and yarn to the library to be schooled in the art of crochet.

We were the only ones there. I kind of figured as much. It's kind of sad to me how the art of making things by hand is so rare now.

Needless to say, we got lots of attention. Well, my friend did. I caught on super fast. The teacher said it must be because I'm just a crafty person by nature. I zipped through the second row onto my third row without a problem. Maybe my mom just didn't show me how I needed to see it. It's possible- she is left-handed and I'm not. We only learned single crochet, but she did kind of show us half-double and double crochet and I picked up double crochet from that without a problem. When I got home, I looked up a few videos and now I can single crochet, half-double crochet, double crochet, and triple crochet! I've practiced most of the evening and I think I have it down pretty well.

Now I just need a project. The teacher suggested potholders or washcloths, but I want something a tad more complicated. I know I should start simple, but I'm just crazy like that. I really want to make a hat. In the round. But I won't start with that, I'm not that crazy. =) So off I go to find something...

Sunday, June 13, 2010

BDU skirt tutorial (times TWO!)

Alternative title: How to confuse the mess out of anyone who wants to learn how to make your skirt. It was too long though.

I made this skirt a while back, but when Crafterhours decided to have a skirt week, I thought I'd enter it and make a little tutorial to go with it. Now, I realize that the audience for this type of thing is very limited. Not everyone has BDUs sitting around the house begging to be cut up. But I imagine with some adjustments you could probably make this out of a pair of khakis that have a wide hem. Or really any pants if you want to make a waistband of some sort.

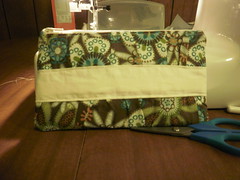
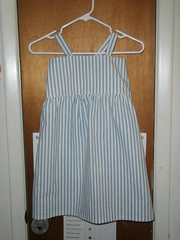
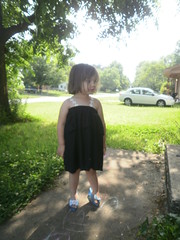
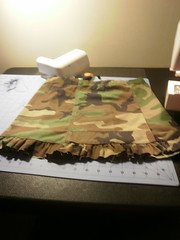
First of all, here is the skirt:

P6060012

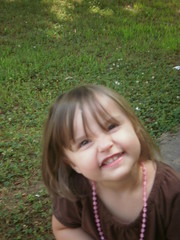
Miss O was being so cooperative, as you can see.

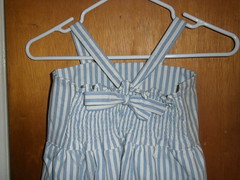
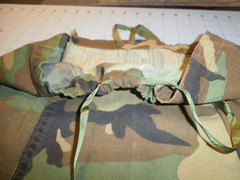
Secondly, this is a pair of BDU pants:

P6080012

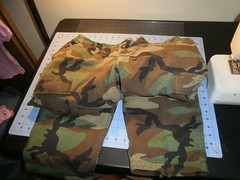
AKA - military camo pants. Only I don't think they look quite like this anymore. It's been almost 7 years since my husband was in the Air Force, so we're pretty out of the loop.

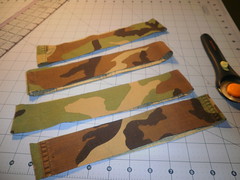
You begin by cutting off the bottom of the pants, like so...

P6080014

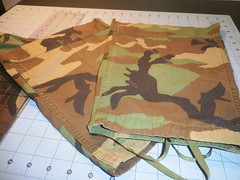
I cut mine approximately 15 inches from the bottom, but the length depends on how long you want the skirt really. See the straps hanging from the bottom - they will be important later. This is what will make the difference between these particular pants and any other type of pants you might chose to use.

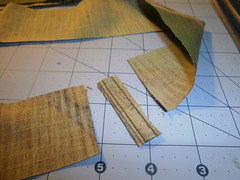
Next, you will need to cut the legs open. I didn't do it quite right on this particular skirt, but you will want to cut up the middle of the side opposite the opening for the straps. Make sense? Don't cut next to the seams, it will confuse you later. Trust me on this one. Sorry, I don't have a picture to help explain. Whatever you do - don't mess with the straps. You want them sewn in place when you do the side seams.

Lay your pieces right sides together. The strap openings should pretty much line up - they should be in the middle of each panel.

Now it's possible that the ends might not match up, like mine. Maybe I did a terrible job cutting, maybe everyone will have this problem... regardless, take the time to just even everything up a little.

P6080021

Sew the sides and finish your seams however you normally do.

P6080022

Now, unless you chose to hem it, you're done. Seriously. I didn't hem mine because the material frays like denim and I had decided to wash it a few times to see how I liked it before hemming it and I liked the look. But, by all means, hem away if you prefer a more finished look.

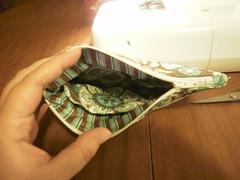
This is how you keep it on your kiddo's hips:

P6080024

These straps are drawstrings. Unfortunately, the front and back are worked by separate straps, but what I did was tighten the back and tie a very sturdy knot in it so it would stay in place and I just use the front one to adjust the waist. If you are using a different type of pants, you could always run elastic or a drawstring through the hem (if it's a wide hem), or make a casing.

You'll notice this is a different skirt in the tutorial than the one on my child. Since I was sewing a new one, I thought I'd try something a little different and add a ruffle to the bottom.

Cut 3 or 4 strips of fabric off of the remaining pant legs. I cut mine at 2", but if you want a longer ruffle, of course cut a wider strip. I only used 3 of my strips, because it's a thicker material and not that easy to gather.

P6080016

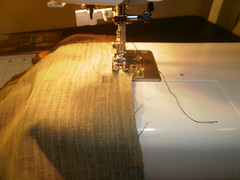
I opted to cut the thick seams out to make it easier on my sewing machine.

P6080018

Sew together the individual strips into a tube about 1 1/2 to 2 times wider than your skirt. I went with 1 1/2. Hem if desired. Sew two lines of gathering stitches and gather the ruffle to the width of your skirt and pin and sew in place.

P6080026

Ignore my awful manicure. ;)

Press the seam up, flip the skirt right side out and topstitch close to the seam to help the ruffle to lay down properly. With a material this thick, it will want to flip up otherwise.

P6080028

And then you will have this:

P6080029

I don't have a photo of anyone wearing it yet, but Miss I looked super cute in it and a hot pink halter top.

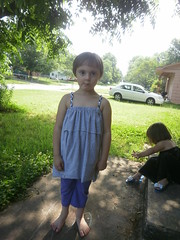
Since I don't have a picture of the new skirt, I'll leave you with some cute shots of Miss O modeling the original:

P6060014 P6060016

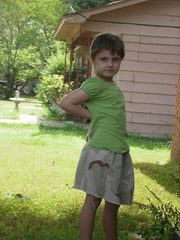
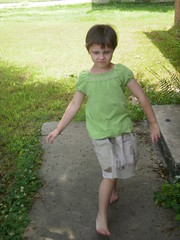
(That's her model walk. She's hilarious) (oh yeah, the skirt isn't that uneven, it's just how she's standing... I promise =) )

And Miss Z wanted in on the action and she's too cute to ignore:

P6060017


Saturday, June 12, 2010

Clapping my hands with glee =)

No, this post has nothing to do with the show "Glee." I've never even watched it. I know, shocking. Kind of like when I told people I'd never seen Goonies. Relax, I've seen it now. Not sure what the fuss was about, but I've seen it.

So, why am I so giddy? A couple of things...

First of all, I woke up and checked my blog list and discovered I was featured on Ruffles and Stuff. My cute little Dodo in her black Beachcomber dress. Very exciting.

Secondly, my sewing machine has a home. Up until Thursday, any time I wanted to sew, I had to set up my sewing machine on the kitchen table. Not really convenient, but it just goes to show how much I love sewing since I was willing to set up/ take down the whole operation any time I wanted to do something. I decided to give the poor thing a home and since I was off of work last week, I rearranged my bedroom to make space for it. It's perfect. I haven't had a chance to use it since, though. Maybe tonight.

Thirdly, and finally, I'm considering selling my stuff. I have a friend involved with The Memphis Flea Market and I'm going to go this weekend and scope it out. See what kind of stuff people are selling and if I have anything different to offer. My friend says she thinks my stuff will go over really well. I'm pretty excited about the idea. It's just an idea right now though and Mr. Bill isn't extremely supportive. He wants me to sell online first, and I might, but I think I'll have more luck in person. We shall see...

Monday, June 7, 2010

Happy Birthday Big Sis!

My older (oh, so much older *teehee*) sister turned 40 this past weekend. We don't always exchange gifts for birthdays in my family, but I felt that 40 definitely deserved a gift. My first idea was a key fob I found in a shop on etsy (look up SpoonerZ, her stuff rocks!), but I liked it so much and didn't think that it would come in in time that I decided to keep it.


Bad sister, I know. But instead I decided to make her a present instead. That's so much more personal than a keychain, anyway.

I had wanted to try my hand at making a clutch and settled on Noodlehead's Gathered Clutch. This is how it turned out for me:

Deirdre's bday present

I saw the fabric and it just screamed her name to me. She's a huge turquoise fan.

The inside:

Deirdre's bday present

It was my first time sewing a zipper and it wasn't quite as scary as I anticipated. The inside was a bit bunchy and one of my top corners turned out a bit wonky, but I was super impressed overall. I'm most definitely going to make another one for myself.

And the best part is that the keychain arrived the day before I was going to see my sister. OK, that's not the best part... the best part is that the seller sent me TWO. I had mentioned in a convo with her that I loved the keychain and had bought it as a gift, but wasn't sure I would be able to part with it. So she sent me an extra one. One was a smaller fork, which seemed like a good zipper pull to me, so I attached it to the clutch and gave it to my sister and the bigger one resides on my formerly boring set of keys. Maybe a really good sister would have given the bigger one as the gift, but I'm a brat like that.

In other news....

I've been making superhero costumes for my cousin's soon-to-be-4-year-old twins. I am going to attempt a tutorial because I couldn't find a cape tutorial that I liked. I'm not used to sewing for boys, so it was a nice change of pace. I learned that boyish fabric that isn't sports or transportation related is nearly impossible to find. Especially when your only opportunity to run to the fabric store alone is 15 minutes before they close and you are speed shopping to try to get the fabric to the cutting table before the employees chase you out of the store with pinking shears. It was better than chasing my 3 crazies through the aisles and trying to keep them from pulling every button off the display.

Wednesday, June 2, 2010

June Organization

I have a lot on tap for this month, so I need to get my thoughts organized before I just go nutty.
  • Corset top for best friend - Finished, but I haven't seen her to give it to her or get pictures.
  • Corset top or dress for best friend's daughter - may need fabric for this - I was going to refashion my old bridesmaid's dress for this, but it would look really trashy as a corset dress (teal crushed velvet)... still debating
  • Sundresses for my 2 nieces - Finished
  • A freezer paper stenciled tshirt for my nephew (because I don't know what else to make a boy) - Finished... actually a bleach designed shirt and I think I like that better =)
  • Refashion dark gray striped shirt
  • Refashion light gray striped shirt
  • Apron for me (I have some fat quarters that would be good for this) - Partially made. I need more fabric and bias tape. Not extremely happy with it, but I had to try it.
  • Aprons for the girls (I think I'll let them pick out the fabric and they'll be pretty simple)
  • Re-refashion the Goodwill dress
  • Refashion other Goodwill dress
  • Work on lengthening some of Izzy's pants
  • Make a pair of scrubs (I really want to try this)
  • Organize fabric stash
And adding (which will probably be done before the rest of the list up there:

  • Super hero capes for the twin birthday boys
  • Father's Day presents
  • Barbie Organizer
  • Clutch from Noodlehead's tutorial
  • Present for sister


Tuesday, June 1, 2010

Let's play catch-up!

So, I know I haven't been posting much (not that anyone reads this to notice =P), but I have been busy. I'll give you a quick run-down of the things I've been up to:

Mom's Mother's Day pillow Gram's Mother's Day pillow Nana's Mother's Day pillow

Pillows for Mother's Day. They were all made using the "Hug Pillow" tutorial on From An Igloo.

Alex's RPSLS bleached tshirt

A bleach pen designed shirt for my nephew - that's Rock, Paper, Scissors, Lizard, Spock.

Chela's dress Chela's dress

A dress for my niece, Chela. Unfortunately, I got word this morning that it's too short. It's OK for "around the house" wearing, but a bit too short for wearing out. Sad. But considering I made it without knowing her measurements, I'm happy that the rest of it fits. =) It was made using the "In The Garden" dress tutorial at From An Igloo.


Dragonfly bleached tshirt "Razorback" bleached and dyed tshirt

More bleach pen shirts. The Razorback (or rather, Razorblob, as I like to call it) was made by bleaching the design and then dying the entire tshirt red. Of course, since it was black, only the bleached section turned red. Super cool... I'm going to experiment with this more.

White "Beachcomber" shirt Gray "Beachcomber" shirt Black "Beachcomber" Dress

And, of course, I didn't forget my kiddos. These super-cute dresses/shirts came from Ruffles & Stuff's "Beachcomber Dress" tutorial. Of course, except for Zoe, my kids are much bigger than hers, so they are much shorter garments. But they make excellent shirts, too. I bought a 3 pack of tshirts for them, and I'm experimenting on turning the rest of the shirts into shorts (using the sleeves). I'll let you know how that goes.


Right now, I'm working on a "from scratch" project. Straight from my very own brain. I'm trying to take pictures so that I can post a tutorial when I'm done, but I'm not too good at breaking my concentration for that. =) I couldn't find a tutorial like it online, so I'm trying. I'll keep you posted.