Wednesday, December 29, 2010

My baby is almost 3

It's hard to believe... my sweet little Dodo is going to be 3 on Friday.  But, if you ask her, she will tell you that she's 5 and will be turning 10 on Friday.  She's so funny. 

She has been asking for earrings for about a month now.  I don't remember her sisters ever requesting anything for their birthdays at 3, but this is what she wants.  I've explained to her that she will have to have her ears pierced and that it hurts, but she does not care.  Her older sisters have their ears pierced and she wants earrings, too.  I got Olivia's ears pierced the first time she had her hair all cut off (yes, this is a recurring theme in our house... with all three of them)... she was 2.  Bill took Izzy to get hers when she was about 2 also.  He swears he will never again participate in that ever again.  I'm not too thrilled about it myself.  That's why Zoe doesn't have pierced ears yet.  I'm kind of dreading it.

She also asked for a sock monkey hat when I was making my nephew's Christmas present.  That I can handle.  =)  I didn't want to make the same hat I've made a dozen times now.  I thought she needed something special.  This is what I came up with:

Zoe's sock monkey hat

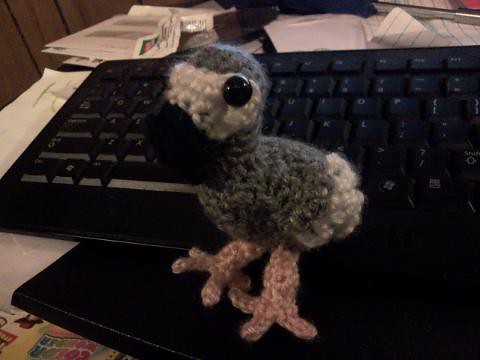
Now, what I wanted to make for her was a stuffed Dodo.  I found this pattern one day and have been dying to make it.  When I started it, the first thing I noticed was how small it is.  It is so tiny.  It took me no time at all to finish it and I can't wait to give it to her.

Dodo's little dodo

Finally, I ran across this pattern the other day and decided Zoe also needed a party hat.  I don't have a picture of it just yet, but it's black and white striped with pink polka dots, trim, and pom pom.  And a pink "3".  =)  Hopefully she won't be too disappointed that it doesn't have a "10" on it.  ;)  It's a great (and free) pattern, by the way.  It has two layers of crochet with plastic canvas (and I was just shocked that I actually had plastic canvas on hand) in between, so it is very sturdy.  If I hadn't put the "3" on it, she could use it year after year.  I'm sure I'll be making more.

I'm so excited for her to get all the goodies I made for her.  Not so excited about the ear piercing...  Maybe hugging her little dodo will make the pain more bearable.

Wednesday, December 22, 2010

Some Christmas sewing

Earlier in the Christmas season, I had huge plans to make most of our Christmas gifts.  Sisters-in-law, nieces and nephews, kids...  I was a bit too ambitious in my planning.  I wanted to make some amigurumi dolls for the girls, but there just was not enough time.  I hated not giving them anything handmade, though.  Not that they care, really.  But I do.  Over the past few weeks, I've found some really pretty non-traditional bandannas and snatched them up to sew into dresses.  Tonight I finally got around to sewing together 3 dresses.  I have a few more to sew up, but they can wait until after Christmas.  I don't have enough to give each one 2 dresses and heaven knows we don't want that kind of drama, so I just did one each.


 I've had these bandannas for months, actually.  It's not a color I normally go for (it's more peachy in person), but I think the girls will like it.  It doesn't matter who gets which dress, because all three wear the same clothes.


 The thing with bandannas is that they usually aren't cut very precisely.  Especially these.  Because of the nature of the dress, it's not normally an issue, so I'm hoping the fact that these were WAY  off doesn't effect how the dress hangs.


I think this one is my favorite.  I didn't even realize it was the same pattern as the other one, because I bought them at different stores at different times.  I like the color better on this one. 

I think they'll look so cute on the girls with some turtlenecks, leggings, and their new boots Santa is bringing.

Merry Christmas!!

Felt Coal Bag

My sister showed me the cutest bag about a week ago... a little black felt gift bag embroidered with the word "coal."  My first thought was "I have to have that bag!"  Then I thought, "I can totally make that bag!"  I wanted to put my husband's Christmas gift in it, but the bag my sister had was a little too small.  So I decided to give it a try...  and I'll show you how to do it, too.  Bear with me.  I'm not all that experienced with tutorials.

You will need 4 - 9x12 inch sheets of felt, or if you buy it off a bolt you can just cut it to size.  The sheets were the perfect size for me.  When I bought mine, they were 4/$1.  (I think my sister paid $3 for her small bag, so I got out cheaper, too!)


You will leave two of the felt sheets whole.  Cut one felt sheet in half length-wise so you have 2 - 4.5x12 inch pieces.


The fourth sheet will be the bottom and straps.  The bottom should be 9x4.5 inches and the straps were 9x1.5 inches (cut 2)

So, to review...
(2) 9 x 12 inch pieces (I'll call them front and back)
(2) 4.5 x 12 inch pieces (I'll call them sides)
(1) 4.5 x 9 inch piece (the bottom)
(2) 1.5 x 9 inch pieces  (straps)

Now, there aren't any construction pictures, because it's black felt and black thread, and you really can't see anything.  So hopefully I can describe it adequately.  It is really simple.

Match up the front to a side and sew together with a 1/4 in seam allowance.  Stop about 1/2 in from the bottom of the bag.  This will help you sew the bottom on.  Then match up the side to the back, the back to the other side, and finally the side to the front.  You will have a square tube.

If you are like me, your felt will creep a little.  You can even up the bottom of the bag if it's kind of wonky. 

Take your bottom piece and line it up with the front, with the bottom piece inside the tube.  Start 1/4 inch from the side and sew until 1/4 inch from the other side.  Line the bottom up with one of the sides and sew all the way across minus 1/4 inch from the back, and do the same for the back.  Your final side you can sew all the way across.  You will have this:


Now, like the original bag, I am leaving it with the seams on the outside.  But if you were making this for something else, you could totally clip your corners and turn it inside out for a smoother look.  You might have to press it a little for crisp edges.

Next, pin your straps on, about 2 inches in from the sides... or where ever it looks best to you.  Sew them in place.  You can do this however you like... I just sewed back and forth across the strap.


Voila!  You have a bag.  It was really quick and simple.  You could do this in any color felt and embellish it any way you want.  Use contrasting thread, or whipstitch the edges.  Sew on appliques.  Go nutty.   I embroidered the word "COAL" on mine (but it will be stuffed with The Muppet Show Seasons 1-3 on DVD because my husband has been a very good boy this year and he loves The Muppets).  I free-handed it, and it's kind of sloppy-looking, but I guess a coal bag would be, huh?

Here is how mine turned out:


Friday, December 3, 2010

Christmas Card!

Ornament Bubbles Christmas
Make a statement with Shutterfly Christmas photo cards.
View the entire collection of cards.